So you are interested in making tumble-polished gemstones? That’s great! I would like to show you how easy it is to turn the rocks shown on the left side of the photo at right into the tumbled gemstones shown on the right side of the photo. We will go step-by-step through the tumbling process using plenty of photos -- so that you will understand exactly how it is done.
The tumbling process is simple. You start with some broken rocks, known as tumbling rough, (as shown at right) and place them into a tumbling barrel (like the black barrels in the photos in the right column) with some abrasive grit and water. The barrel is then rotated over and over 24 hours a day on a rock tumbler that is powered by a small motor.
All of this tumbling wears the rough edges off of the stones and produces smooth, rounded pebbles. These are then run through a polishing step to produce the shiny gemstones shown in the right side of the photo. Tumbling rocks is easy and fun. You can use the tumbler menu at right to progress through this lesson. We hope that you have a lot of fun!
Step 1: Coarse Grind
Inspect the rocks that you are about to tumble. Make sure that they are the same hardness and of various sizes. Remove any rocks that are cracked, have deep voids or have extremely irregular shapes. These should be discarded or broken. Heres the correction : After tumbling for over 6 months, wondering why I havent been able to get another shiny batch in 3 batches, I went back to the web and discovered I've been over filling my barrels!!! Pics coming
Note: If you are tumbling rounded beach rocks or rocks that have been pre-tumbled and are satisfied with the shape of the rocks, you may skip the coarse grind step and go straight to the fine grind. But if your rocks are broken, have jagged edges, or you would like them to be a bit more rounded, put them through the coarse grind first.
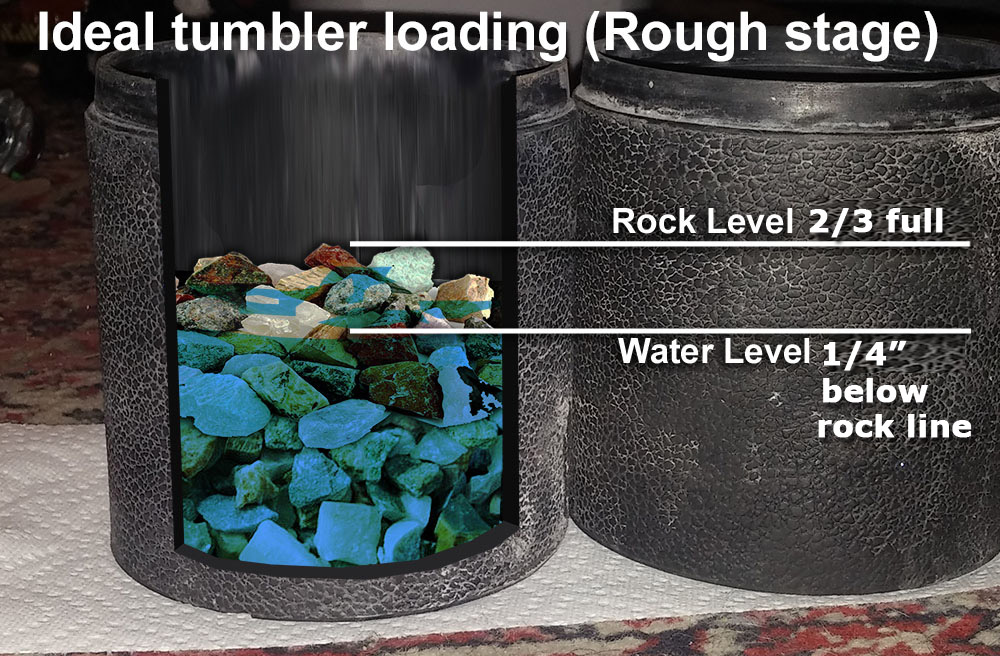
The barrel must always be at least 1/2 full for the tumbler to operate properly. But don’t overload it! Barrels more than 3/4 full (including grit and water) may be too heavy for your tumbler’s motor and there might not be enough space inside for the rocks to tumble. A 3 pound tumbler has a motor designed to tumble a barrel that weighs up to 3 pounds, a 6 pound motor can handle a barrel or two barrels weighing 6 pounds total, etc. If you’re not sure if the barrel is too full, weigh it after adding the water.
Add enough water to reach the bottom of the top layer of stones, but not so much that they are covered. You want to see some of the rock above the water. See photo to the right.
Use a paper towel to clean the inside and outside rims of the barrel and the edges of the lid. Make sure the surfaces that will form the seal are clean and dry.
Place the lid on the barrel and seal the barrel. Put the barrel on the tumbler and start the motor. And we’re off!
Stick around for a few minutes to make sure the tumbler is running smoothly and the barrel isn’t leaking. If the barrel is leaking, stop the machine, remove the lid and re-clean the surfaces of the lid and barrel that must make the seal. Double-check that they are clean and dry. Replace the lid securely and proceed. Also, check the tumbler in a few hours again to make sure it’s still running smoothly. After this, it can probably be left unattended, but it’s not a bad idea to check up on it every day or so.
If you have a double-barrel tumbler, you might will need both barrels charged (loaded) for the tumbler to function properly. We recommend filling both barrels with batches of coarse grind of the same hardness so that they can be combined later on. Then you can have one barrel running a batch of fine grind while the other prepares more rough.
Let the tumbler run for 7 days, 24 hours a day. You can open the barrel to check the slurry (the muddy liquid inside) or to release gas build-up (gas build-up is usually not a problem) occasionally if you like, but be sure to clean and dry the seal areas before replacing the lid! After 7 days, stop the tumbler and open the barrel. It will look like a barrel of mud!
DO NOT POUR THE MUD OR THE USED GRIT DOWN A DRAIN. It can clog your plumbing system. Instead empty the barrel into a colander over a plastic bucket or a disposable container, like the bottom half of a milk jug or 2-liter bottle. Rise thoroughly with a weak stream of water. Wear safety glasses while rinsing to protect your eyes from a possible splash of muddy water.
Now that you have rinsed the rocks, take a good look at them.
Virtually all of the shaping is done in this first step. The other steps only smooth the rock, not shape it, so the shape you see now is what you will end up with if you continue to the fine grind. If you would prefer your rocks to be more rounded, you should repeat this step with fresh coarse grit until they are shaped to your liking. It may take a few re-runs, but the extra wait is worth the results. Don’t be in a rush! Quality takes time. We are picky. When we tumble most loads of rock that aren’t beach rocks or pre-tumbled will go through the coarse grind at least twice. If some of the batch is ready to go on to the next step, you should set aside these rocks to wait for the others to catch up.
If there are any rocks that have deep cracks or pits, these rocks should not be tumbled with the fine grind. Particles of the coarse grit will get trapped in these voids and contaminate the next step, scratching the other rocks. Break these rocks and include them with your next batch of coarse grind. If the cracks or pits are very shallow, it might be possible to tumble them out, but this should only be done in the coarse grind. Don’t think that you can scrub the grit out; it’s next to impossible! Be safe and save them for your next coarse batch.
If you are repeating the coarse grind, use fresh grit. The old grit can’t be reused because after seven days it breaks down too much to be effective in shaping (yet will still effectively scratch rocks if it contaminates the fine grind). When charging the barrel, you might need to add new tumbling rough to bring the volume of the barrel to at least 1/2 full. If you don’t have more rough, you can use plastic pellets or ceramic media to bring the volume to 1/2 full.
If you are proceeding to the fine grind, first CLEAN the rocks, barrel, and lid THOROUGHLY. This cannot be stressed enough. If you have grit or slurry left in the barrel or on the rocks when you proceed to the next step, you will contaminate the load and have to start over with the previous step. The particles of leftover grit will scratch the rocks during the next step. While these scratches may be very tiny, the end result could be that the rocks do not polish to a high shine. Thorough cleaning is very important, so take your time and do a good job. You can use paper towels or an old toothbrush to clean the inside of the barrel. Pay particular attention to the seal area and the bottom edges of the barrel - lots of gunk might be trapped here and will not only contaminate your batch, but might cause the barrel to leak. If you opt to use a toothbrush, mark it as “Coarse grind only,” etc. so that you remember what step it can be used for. You should have a separate toothbrush for each step; you don’t want to contaminate the barrel the next time you are cleaning!
Step 2: Fine Grind
Once you have enough rocks for the fine grind, place them in a barrel and add fine grit as shown in the chart to the right:
Add enough water to reach the bottom of the top layer of stones, but not so much that they are covered. If necessary, add plastic pellets to bring the volume of the barrel to at least 1/2 full. Check the seal area to be sure that it is clean and dry. Place the lid on the barrel and seal the barrel. Place the barrel on the tumbler and start the motor. Again, stick around for a few minutes to make sure the tumbler is functioning properly and the barrels aren’t leaking. Check back again in an hour, and periodically after that. Let the fine grind run 24 hours a day for 7 days, then check the rocks. They should appear shiny when wet.